Tray Sealing Troubleshooting for Thermoforming Trays: Channel Leaks, Seal Wrinkles, Stringing, Tearing & Messy Opening (Easy-Peel)
-
Most tray sealing and easy-peel issues come from incomplete specs, unstable sealing parameters (temperature/pressure/time), contamination/wrinkles, and mismatch between tray structure and lidding system—not simply “bad material.”
-
Recommended order: verify leak → inspect wrinkles/channel paths → identify peel failure mode (stringing/tearing/residue) → use a small parameter matrix to lock the seal window.
-
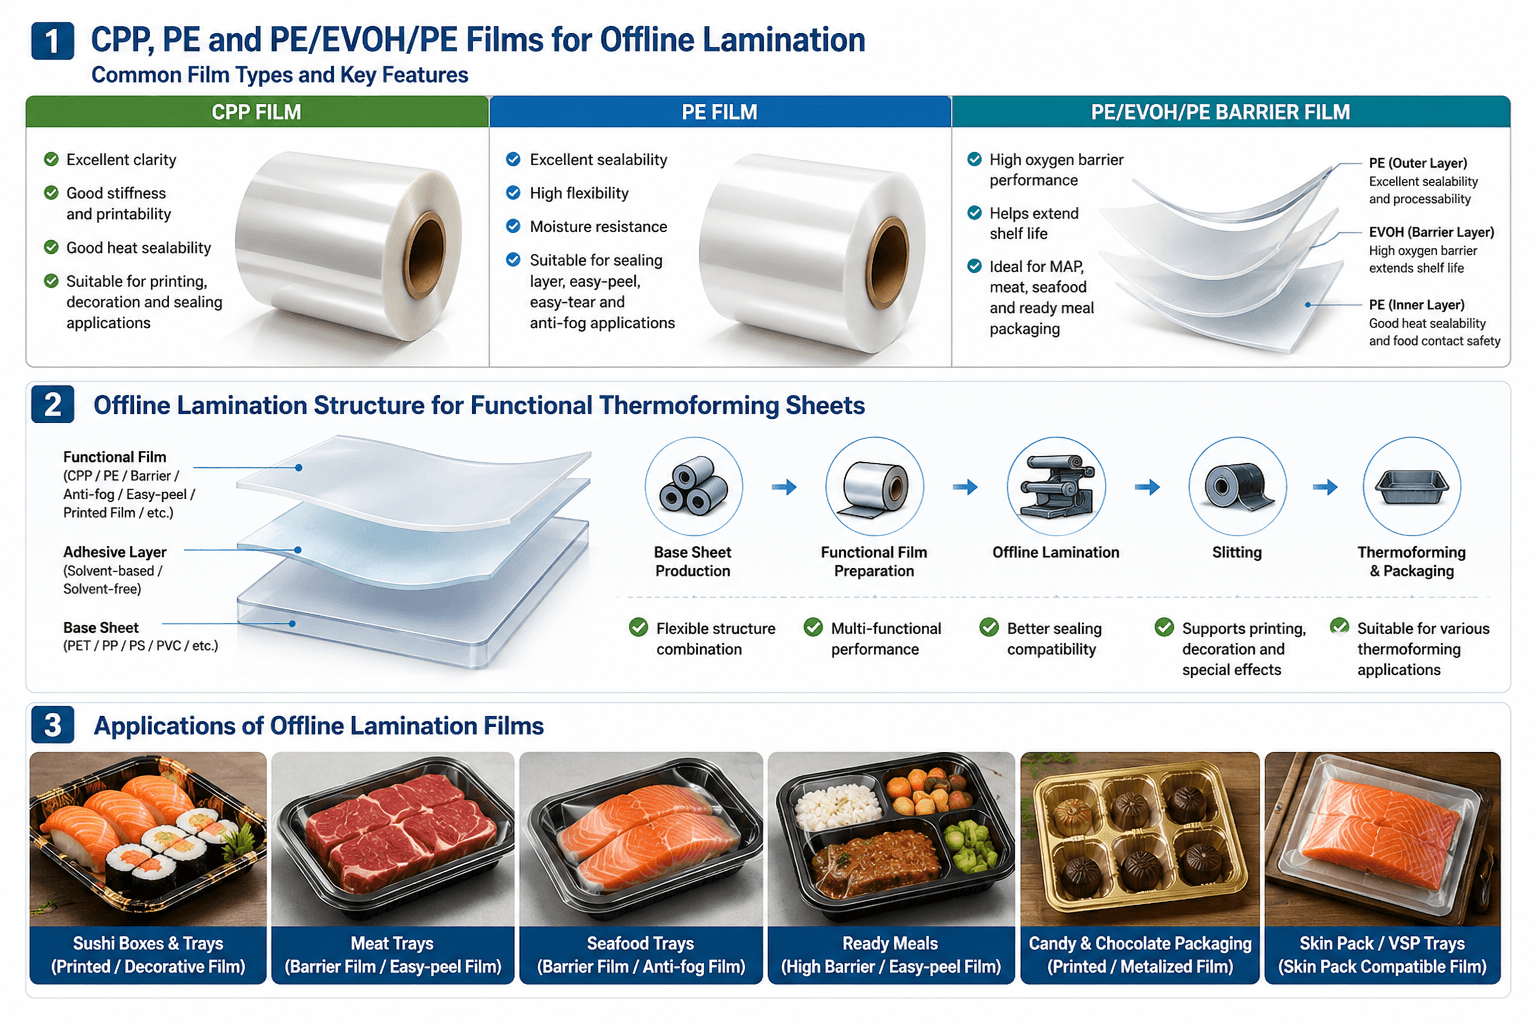
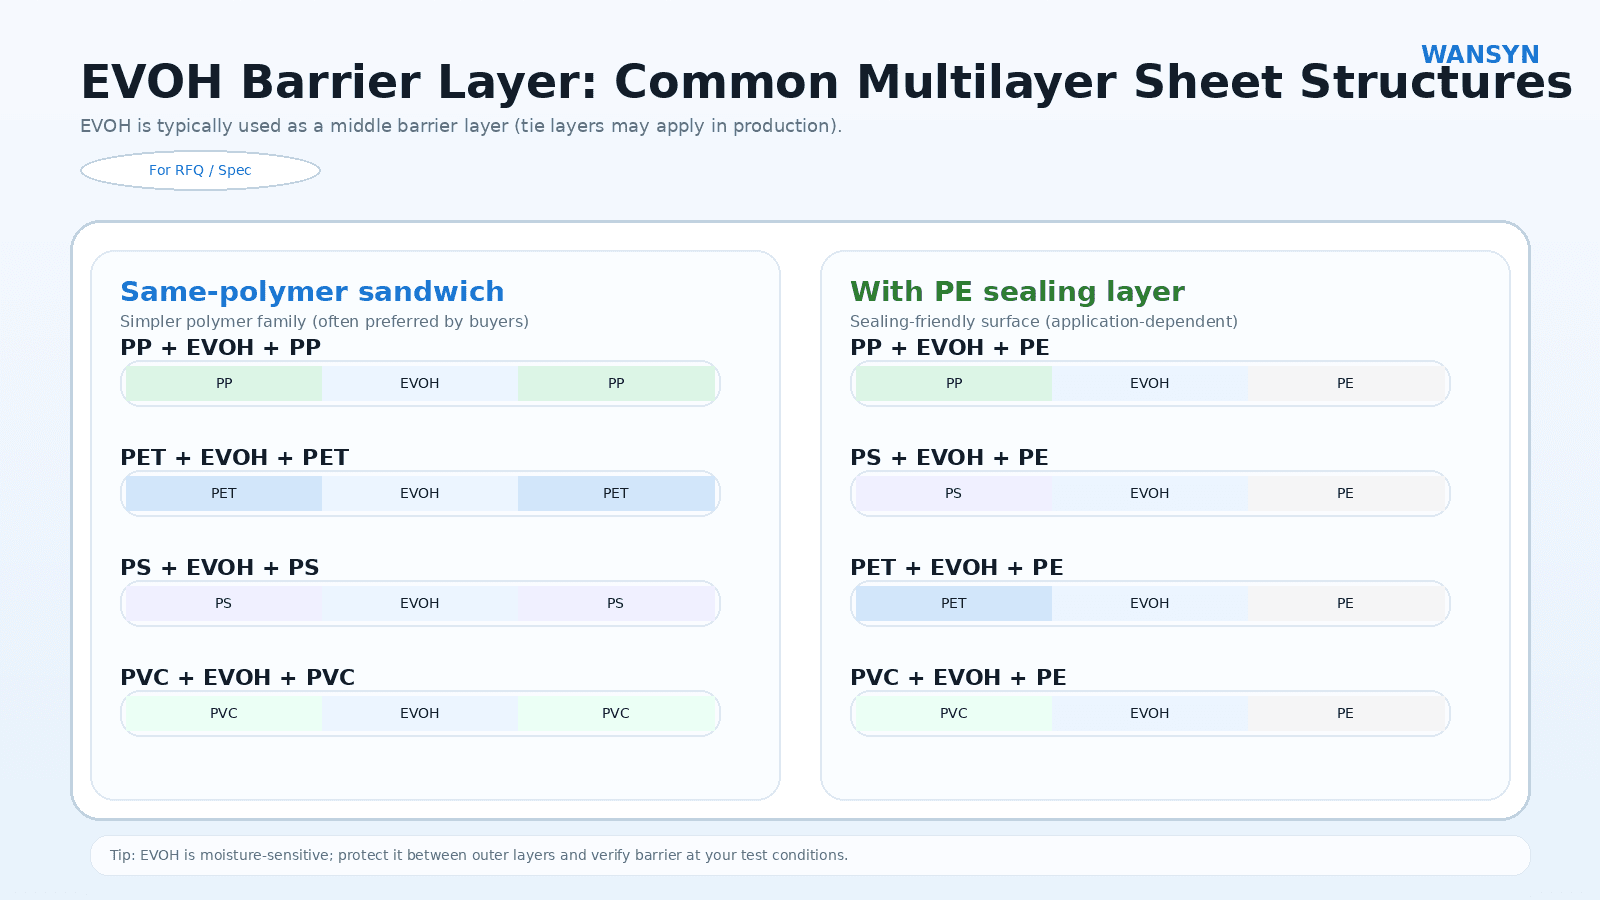
For wider processing robustness and consistent opening (especially for chilled meat/seafood/sushi), laminated sheet rolls (PET/CPP, PP/CPP, PET/PE) often integrate better with barrier / anti-fog / easy-peel / printing requirements.
1) Quick reference table (Symptom → likely causes → first checks)
| Symptom | Common likely causes | First checks (fastest) |
|---|---|---|
| Channel leak / loss of seal integrity | wrinkles creating a leak path, contamination (oil/moisture/dust), uneven pressure / non-flat sealing head, low temp or short dwell, tray warpage | quick leak test (Section 4), inspect seal ring continuity, clean surfaces/fixtures, check head flatness & pressure distribution |
| Seal wrinkle | unstable web tension/alignment, shrink mismatch, overheating softens film, excessive pressure, tooling misalignment | check web tension & alignment, reduce temp or dwell slightly, verify head flatness |
| Stringing (stringy peel) | easy-peel system outside the right window, overheating causes tacky failure, peel force target too high | use a small parameter matrix to reduce temp/dwell, then reset peel target and clean-peel mode |
| Tearing during opening | peel force too high, hard-bond seal layer, sharp tray edges, narrow seal width | lower peel target, optimize seal width/edge, switch to a more stable easy-peel system/structure match |
| Messy opening (residue/jagged edge) | contamination, system incompatibility, parameter fluctuation | stabilize seal window, improve cleanliness/condensation control, specify “clean peel” requirement |
2) A 5-step troubleshooting workflow (use this order)
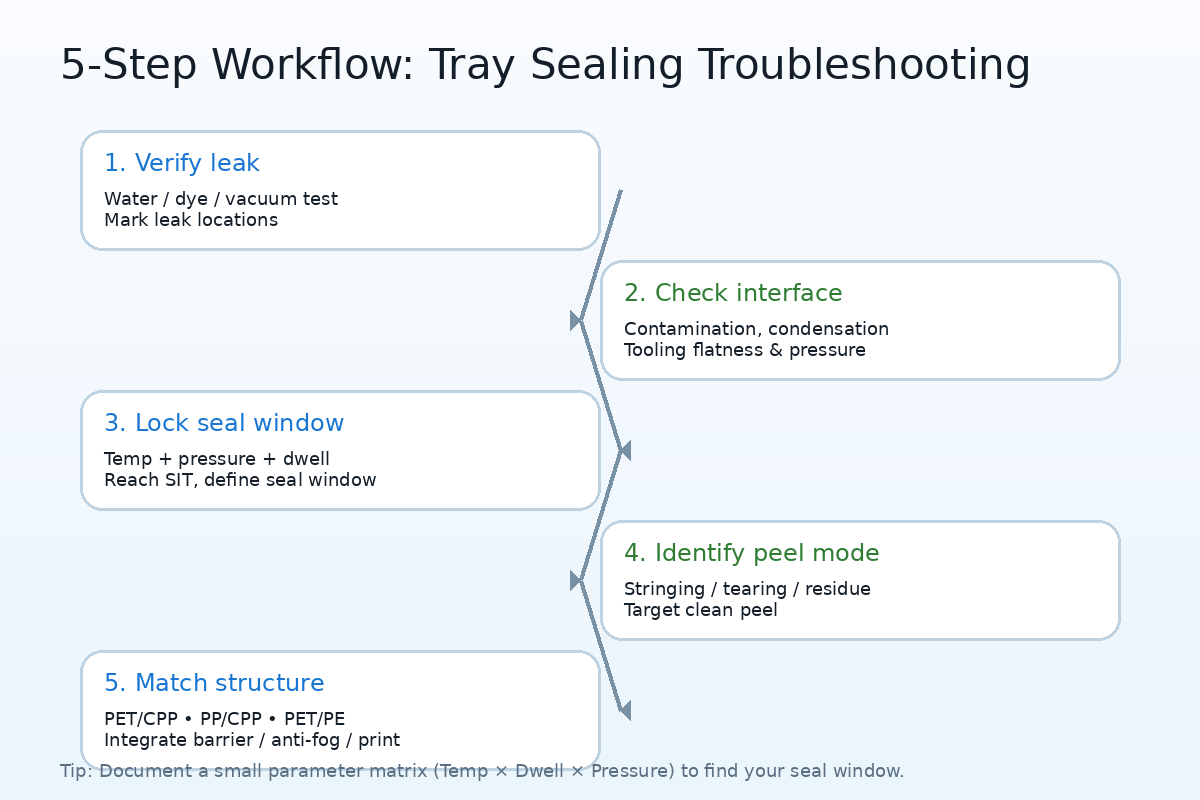
Step 1: Confirm whether it’s really leaking (don’t start by turning up temperature)
Run a simple leak check (water squeeze, dye penetration, vacuum test if available).
Mark leak locations: corners, start/end points, wrinkle zones.
If channel leaks exist, address wrinkles/contamination/pressure uniformity first.
Step 2: Inspect interface + tooling status (contamination + flatness + web handling)
-
moisture/oils/dust on tray flange
-
condensation and anti-fog interaction under chilled conditions(Supermarket meat/seafood/sushi trays: barrier, anti-fog, easy-peel & printing guide)
-
carbon build-up on fixtures, sealing head cleanliness
-
Must-check: web tension stability, alignment/registration, sealing head flatness and pressure distribution
Step 3: Lock the seal window with a controlled parameter matrix
Avoid changing only temperature. Record all three:
-
Seal temperature
-
Seal pressure
-
Dwell time
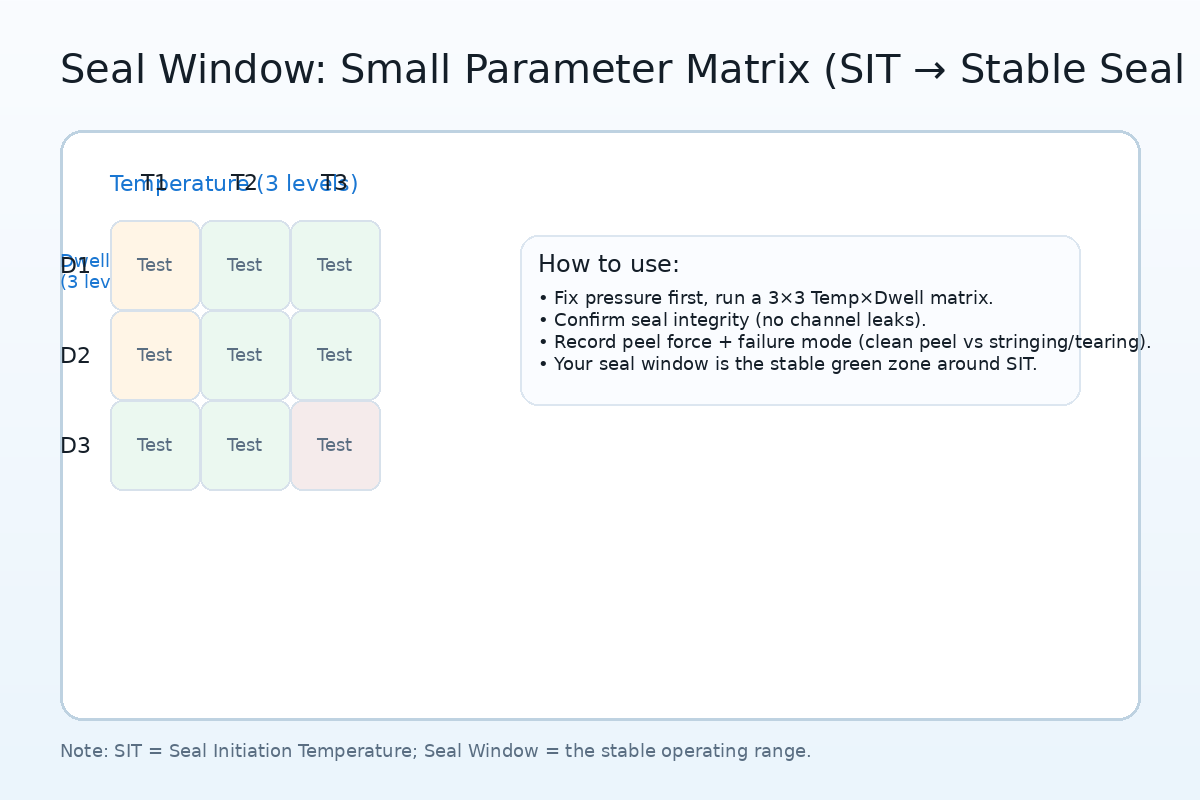
Professional target: reach the sealant’s SIT (Seal Initiation Temperature) and operate inside a practical Seal Window where you achieve both seal integrity and the desired peel mode/peel force.
Start with a small matrix (e.g., 3 temps × 3 dwell times, pressure fixed). Find the boundary where you get no leaks + clean peel, then fine-tune pressure.
Step 4: Identify the peel failure mode (process tweak vs structure change)
-
Stringing: often overheating or outside the correct peel window
-
Tearing: often peel force too high or seal layer too aggressive; also tray edge geometry
-
Residue/messy peel: contamination or incompatibility
Note: easy-peel systems have different mechanisms and sensitivities—more sensitive systems require tighter window control.
Step 5: If parameters are stable but results still vary—move to structure matching
When you’ve locked parameters but still see variation, or you need extra requirements (barrier/anti-fog/printing), structure/system matching becomes key:
-
For wider robustness and consistent peel: consider PET/CPP or PP/CPP laminated sheet rolls
-
For specific sealing setups or cost balance: PET/PE can work—if you clearly define seal window + peel force + clean peel mode
Boundary condition: structure recommendations must be validated with the lidding/sealant compatibility in your actual equipment.
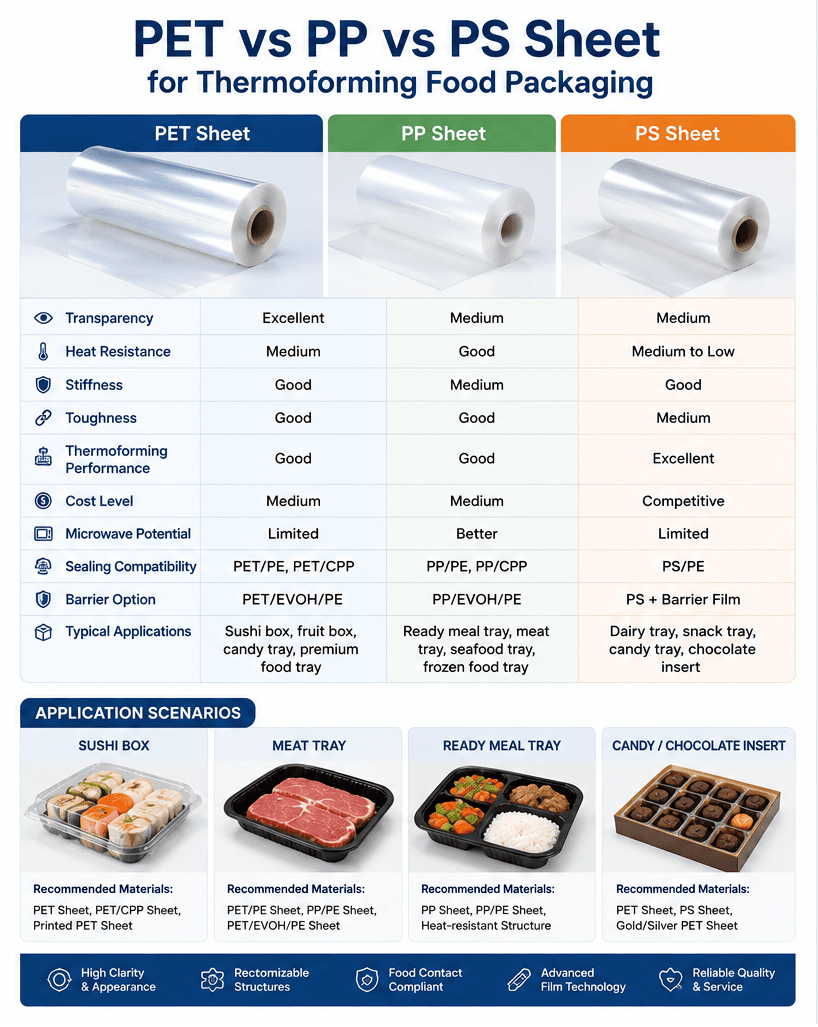
3) Structure guidance (PET/CPP vs PP/CPP vs PET/PE)
PET/CPP laminated sheet rolls
Best when you need a stable seal window + strong print performance + premium display quality
-
easier to build controlled easy-peel behavior
-
great for reverse print + lamination (better rub resistance)
-
fits integrated packages: barrier / anti-fog / easy-peel / printing
PP/CPP laminated sheet rolls
Best when you prioritize toughness and production stability
-
robust for cold-chain handling and impact
-
supports seal consistency first, then functional add-ons
PET/PE laminated sheet rolls
Best when you need specific sealing compatibility or cost-performance balance
-
success depends on clear specs and controlled window/mode targets
4) Recommended validation methods
-
Seal integrity: water squeeze / dye penetration / vacuum leak test (if available)
-
Peel: fixed peel width & speed; record peel force and failure mode (clean peel/stringing/tearing)
-
Seal window: small matrix of temperature × time × pressure; document the boundary and lock the recipe
5) 3 common buyer mistakes
-
Writing “easy-open” without a peel force target
-
Testing only flat sheets, not formed trays (corner thinning matters)
-
Focusing on print color but ignoring rub resistance (critical for sushi printed trays)
6) Copy-ready RFQ checklist
-
Application: chilled meat / seafood / sushi trays (details: ____)
-
Preferred structure: PET/CPP / PP/CPP / PET/PE (or “please recommend”)
-
Thickness: __ mm; Width/Roll OD/Core: __ / __ / __
-
Forming depth: __ mm; vacuum/pressure; line speed: __
-
Sealing method: heat seal / VSP / other; tooling/fixture: __
-
Targets:
-
Seal integrity: no leaks / no channel leaks
-
Seal window: __°C (range)
-
Easy-peel: peel force target __ (or consumer easy-open)
-
Peel mode: clean peel / no stringing / no tearing / no residue
-
-
Anti-fog: yes/no (chilled display: __ days)
-
Barrier: OTR __; WVTR __; test basis: flat sheet / formed tray
-
Printing: sushi pattern/branding; rub resistance requirement: __
-
Cold-chain temperature: __°C
-
Compliance: food contact requirements for your market: __
FAQ
Q1: Is a channel leak always caused by low temperature?
No. Wrinkles, contamination, pressure non-uniformity, and head flatness are common root causes.
Q2: How do you usually fix stringing?
Use a small parameter matrix to bring temperature/dwell back into the correct peel window, then refine peel force and peel mode.
Q3: What’s common for sushi printed trays?
Rub resistance and inconsistent opening. Reverse print + lamination plus a controlled seal window typically helps.
If you are facing channel leaks, seal wrinkles, stringing, tearing, or messy opening, we can recommend a matched laminated solution (PET/CPP, PP/CPP, PET/PE) based on your equipment and targets—plus samples and process guidance to stabilize your seal window and yield.