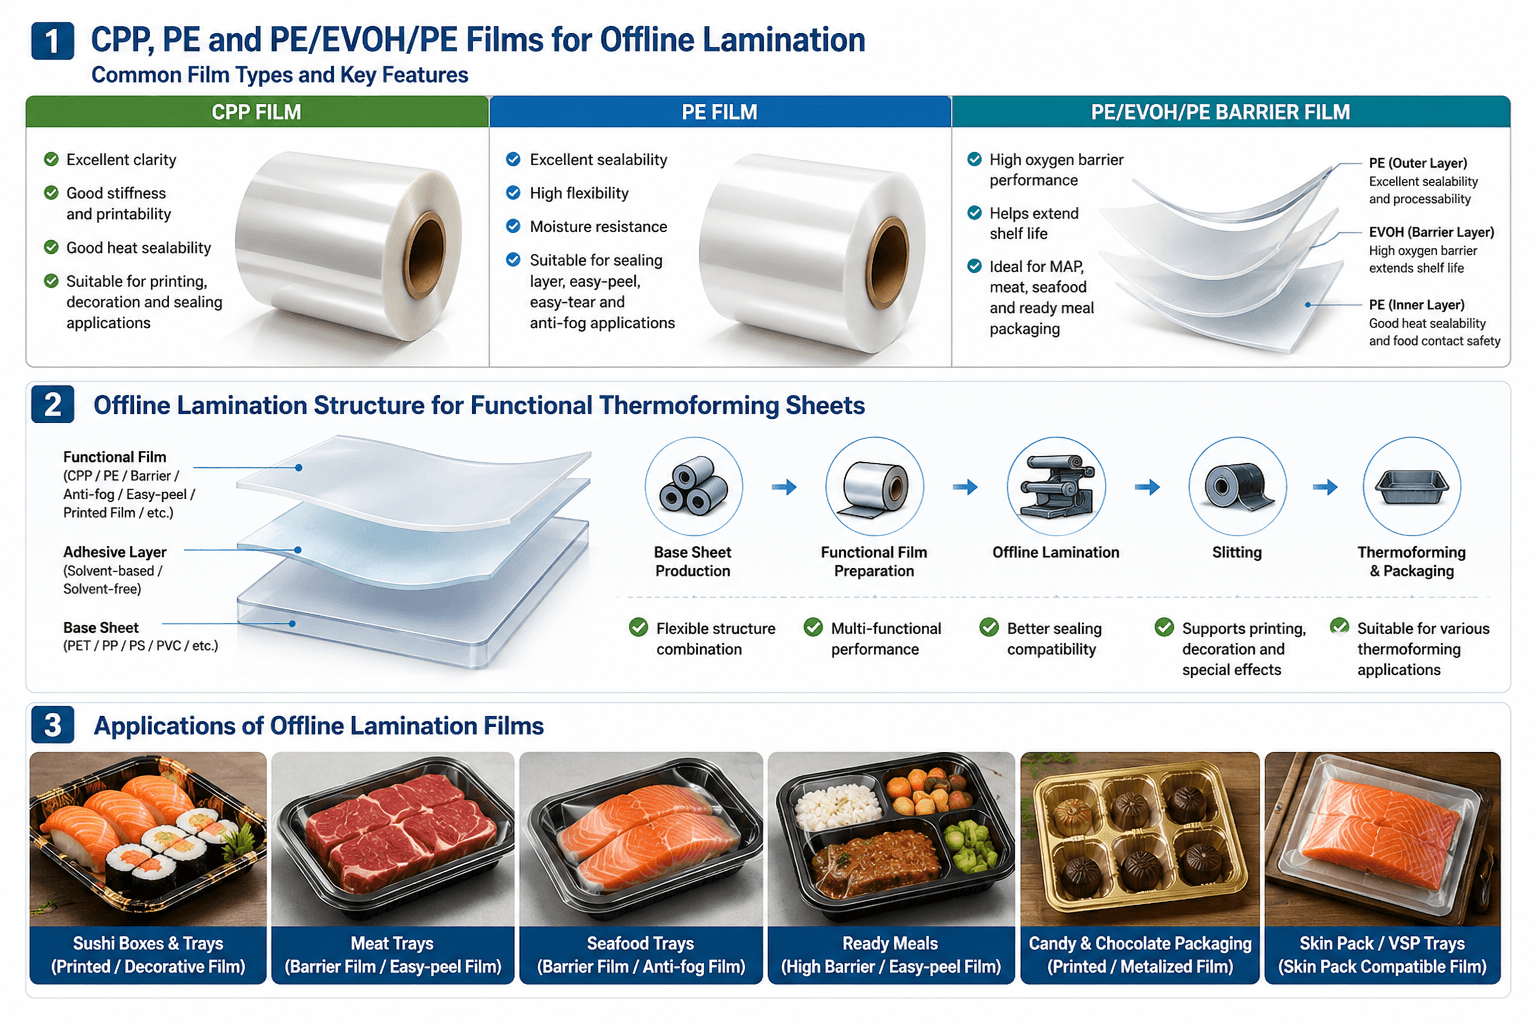
How to Prevent Freezer Cracking in Thermoformed Meat & Seafood Trays (-20°C Cold Chain)
Cold chain packaging may look fine at room temperature—until it goes through real logistics: -20°C freezing, stacking, vibration, and drops. Then you see typical failures:
-
Freezer cracking (often at corners / deep-draw zones)
-
Corner whitening (stress whitening / micro-deformation)
-
Drop breakage after freezing or chilled handling
If you’re searching freezer cracking thermoforming or low temperature toughness tray, the key is this: failures are usually driven by a system of thickness distribution + residual stress + low-temperature brittleness + handling loads—not a single factor.
-
The #1 driver is corner thinning caused by high draw ratio and non-uniform forming thickness.
-
Low temperature reduces ductility, and residual stress makes micro-cracks/crazing grow into visible cracks.
-
The fastest improvement path is: (1) improve thickness distribution, (2) reduce residual stress, (3) validate on formed trays under real cold-chain conditions.
1) Root causes of cracking at -20°C
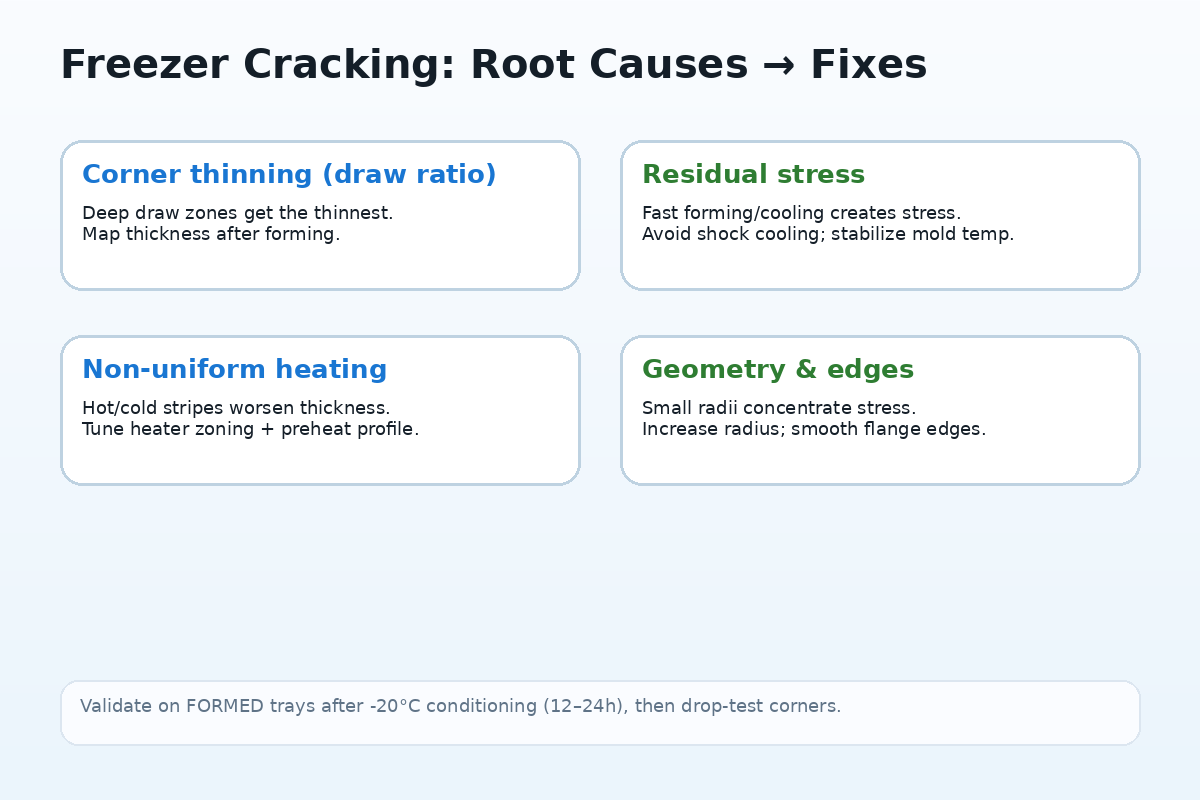
Cause A — Corner thinning from draw ratio (most common)
Thermoforming stretches the sheet; corners and deep draws become the thinnest, weakest zones. Draw ratio is widely used to estimate minimum thickness and thinning risk.
Common signs
-
Cracks start at corners/radii
-
Failures increase with deeper trays
-
Flat-sheet tests pass, formed-tray tests fail
Cause B — Low-temperature brittleness + residual stress
At low temperature and higher strain rates, polymers behave more brittle (less time for yielding). Residual stress can lead to crazing/cracking and eventual failure.
Common signs
-
Whitening before cracking
-
Cracks appear after cold storage/transport, not immediately
Cause C — Non-uniform heating and cooling
Uneven heating increases thickness variation and stress; cooling inconsistencies also raise internal stress and distortion risk.
Cause D — Geometry stress concentration
Small corner radii and sharp flange edges concentrate stress—especially dangerous at freezer temperature.
2) Forming tips to improve low-temperature toughness (before changing material)
Tip 1 — Improve thickness distribution at corners
-
Increase corner radius where possible
-
Use/optimize plug assist to pre-stretch and distribute material more evenly, reducing thinning in deep areas
-
Review draw ratio vs starting sheet thickness
Tip 2 — Improve heating uniformity
-
Tune heater zoning (avoid hot/cold stripes)
-
Keep a controlled preheat profile for stable forming
Tip 3 — Reduce residual stress
-
Avoid “shock cooling”; keep mold temperature consistent
-
Balance forming speed and cooling rate
-
Ensure stable web handling and repeatable clamping
Tip 4 — Validate on formed trays under cold conditions
For cold chain packaging, validate after forming and after conditioning:
-
thickness mapping (corner/wall/bottom)
-
cold conditioning at target temp (e.g., -20°C for 12–24 h)
-
drop tests (corner-first is critical)
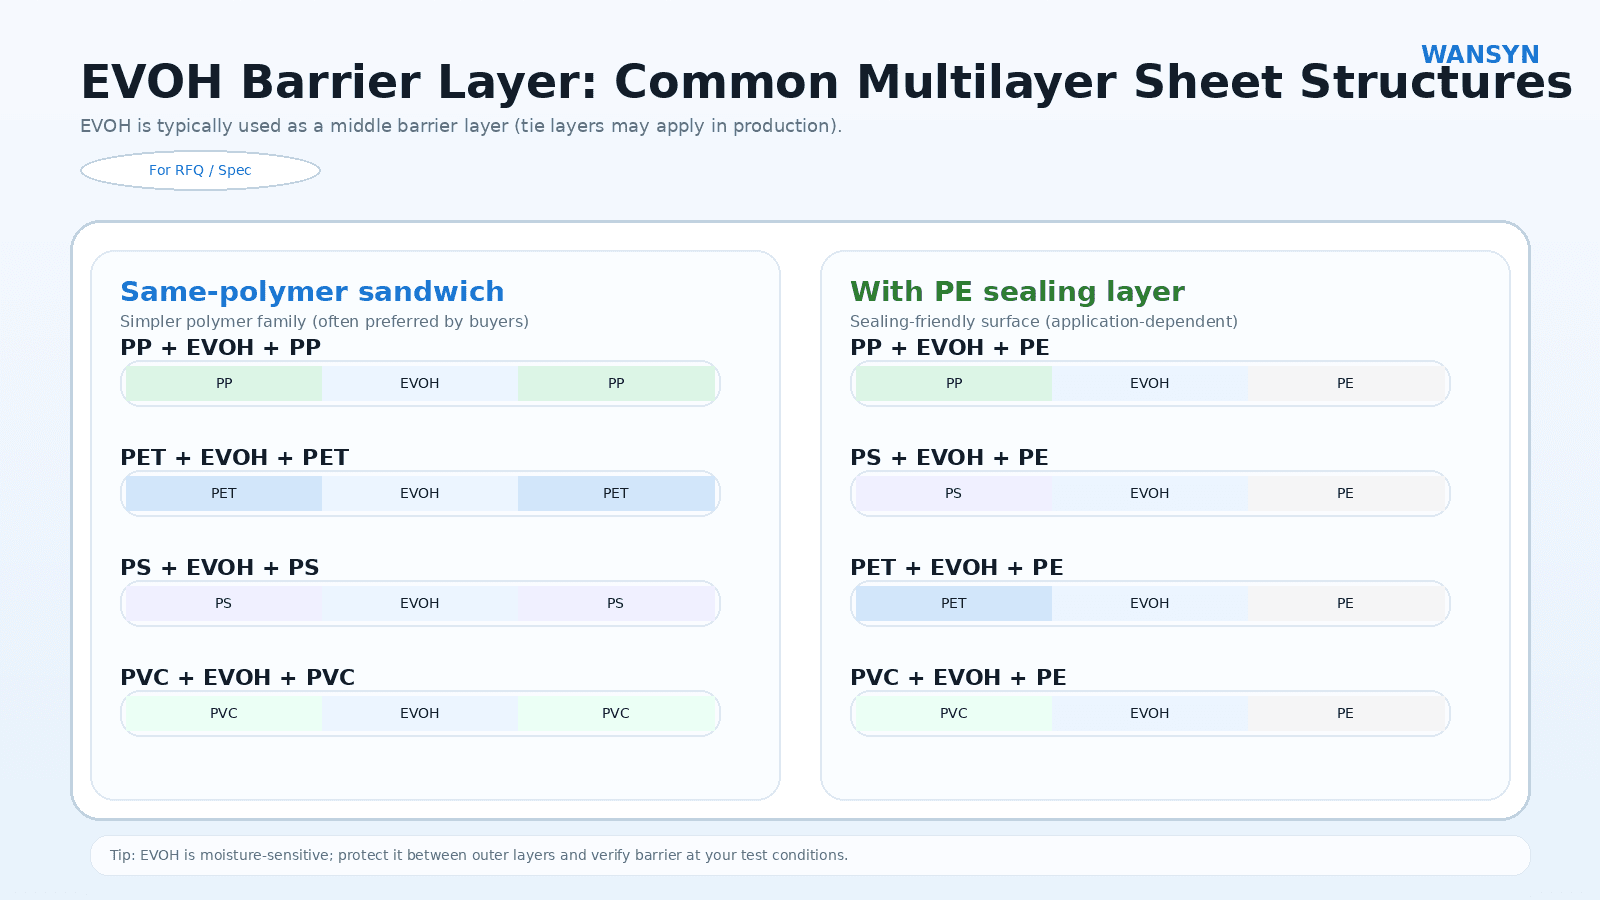
3) Material & laminated structure approaches
Note: “better at low temperature” depends on grade, formulation, and tray geometry. Use structure selection to widen your success window, then validate in your actual line.
Option 1 — Toughness-focused systems (PP/CPP laminated sheet rolls)
PP is often described as more flexible and impact-absorbing than PET in many packaging uses, which can help in handling/transport scenarios—but final performance must be proven in your formed tray + cold tests.
When it helps
-
Projects prioritizing cold-chain handling robustness
-
Need to integrate printing/other functions as a system
Option 2 — PET-based laminated systems (PET/CPP or PET/PE)
PET is widely used for clear display packaging; PET laminated solutions can be engineered for functional needs (printing, barrier, anti-fog compatibility), but require tight control of thickness distribution and cold-impact targets.
When it helps
-
Clear display and branded trays
-
System integration with barrier / anti-fog / printing requirements
Important: Always check compatibility with your lidding/sealing setup—seal integrity and peel behavior can shift under cold conditions.
4) Recommended test plan for “cold chain packaging”
Define your test plan clearly:
-
target temperature: ___°C (e.g., -20°C)
-
conditioning time: 12–24 h
-
drop test: height + orientation (corner-first)
-
stacking load: carton/pallet simulation
-
acceptance: no cracks; define whitening tolerance if needed
5) Copy-ready RFQ checklist
Application: meat / seafood tray (chilled / frozen)
Cold chain temperature: ___°C; storage time: ___ days
Tray design: depth ___ mm; corner radius ___ mm; flange width ___ mm
Preferred structure: PP/CPP / PET/CPP / PET/PE (or “please recommend”)
Sheet thickness: ___ mm; roll width/OD/core: ___ / ___ / ___
Forming: vacuum/pressure; plug assist yes/no; line speed ___
Failure: corner cracking / whitening / drop breakage
Testing: conditioning ___ h at ___°C; drop height ___
Lidding/sealing: heat seal / VSP; (if easy-peel) peel target ___
Functions (optional): barrier OTR/WVTR ___; anti-fog yes/no; printing yes/no
Compliance: food contact requirements for your market ___
FAQ
Q1: Why does it pass at room temp but crack in the freezer?
Low temperature reduces ductility; forming creates thin corners and residual stress, so the formed tray becomes far more sensitive.
Q2: Fastest forming fix?
Improve corner thickness distribution (plug assist, heating uniformity, radius) and reduce residual stress.
Q3: Should I test flat-sheet impact only?
No—validate on formed trays after cold conditioning for realistic cold chain packaging.
If your thermoformed meat/seafood trays crack or whiten in freezer logistics, we can recommend a matched laminated sheet solution (PP/CPP, PET/CPP, PET/PE) based on your tray depth, thickness distribution target, and sealing system—plus samples and application guidance.